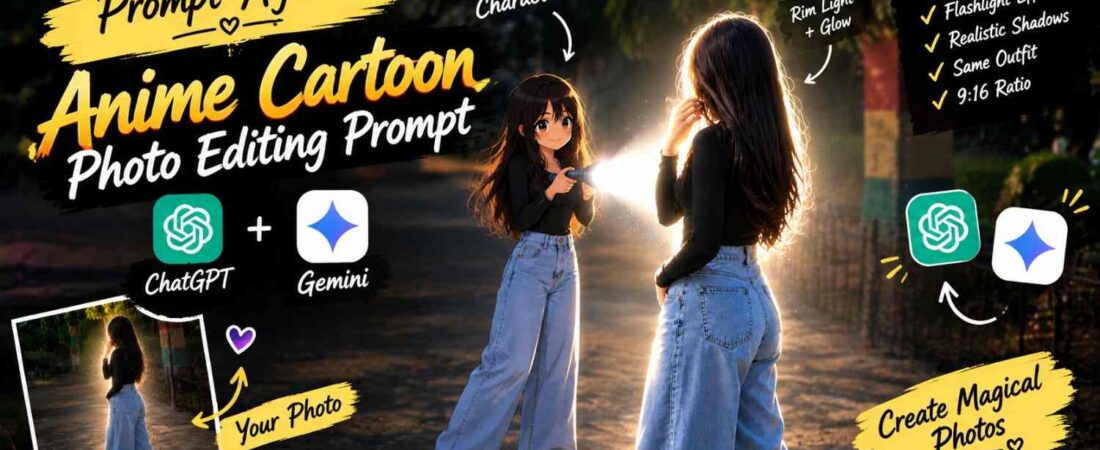
Have you ever wanted to add a small anime version of yourself into a realistic photograph without turning the entire image into a cartoon? This Gemini prompt creates a creative mixed-reality effect where the original photograph stays realistic while a miniature anime/cartoon version of the main subject appears behind them.
The anime character is designed to match the original person’s hairstyle, clothing, accessories and recognizable details. It then holds a flashlight toward the real subject, creating a strong white beam, bright rim lighting and dramatic shadows. The combination of realistic photography and clean modern anime styling gives the image a unique cinematic appearance that stands out on any social media feed.
In this comprehensive guide, we will explore the exact prompt, break down why each element contributes to the effect, and share expert tips for achieving the most seamless and visually striking results possible.
Understanding the Real Person + Mini Anime Character Concept
The main concept behind this photo edit is to combine two different visual styles in a single scene. The original person remains realistic, while a smaller anime/cartoon version of the same person appears directly behind them.
The miniature character should retain recognizable elements from the original subject, including:
-
Hairstyle: The same cut, color, and styling as the real person.
-
Outfit: Matching clothing, including colors and patterns.
-
Accessories: Any jewelry, glasses, hats, or other items worn by the subject.
-
Overall appearance: The anime character should feel like a stylized miniature version of the person already present in the photograph.
This makes the anime character feel like a genuine extension of the subject rather than a random addition. When viewers see the image, they immediately recognize the connection between the two figures, which makes the concept feel intentional and clever.
Why This Mixed-Reality Effect Works
The contrast between the real person and their miniature anime version creates the main visual hook. Instead of converting the complete photograph into an anime scene, only the smaller duplicate character receives the stylized treatment. This keeps the original photograph recognizable while adding a creative fantasy element.
The effect works especially well for social-media posts because the unusual combination of realistic photography and anime styling immediately gives the image a distinctive appearance. It is the kind of image that makes people stop scrolling and look twice.
Modern Anime Character Design
The anime version should use a clean and modern anime aesthetic rather than a generic cartoon appearance. This distinction is important—”cartoon” can mean anything from Saturday morning cartoons to simplistic doodles. “Modern anime” implies a specific visual style that is polished, expressive, and contemporary.
The requested visual characteristics include:
-
Sharp linework: Clean, precise outlines that define the character.
-
Slightly oversized head: A common anime proportion that emphasizes facial expression.
-
Compact body proportions: A smaller, more stylized body compared to the head.
-
Cel shading: Flat areas of color with distinct shadow lines, typical of anime.
-
Expressive facial details: Large eyes, small nose and mouth, and clear emotional cues.
-
Clean anime styling: Overall polished and professional appearance.
-
Matching hairstyle and outfit: The character should look like a miniature version of the real person.
These details help the miniature character stand out while still looking visually connected to the real subject. The oversized head and compact body are particularly important—they signal to the viewer that this is a stylized character, not a realistic miniature person.
The Flashlight Beam Effect
The flashlight is the most dramatic part of the concept. The miniature anime character stands behind the real subject and points a flashlight toward their back. The resulting beam should appear as a strong, realistic white light that illuminates the subject from behind.
The effect should include:
-
Bright white beam: A focused, intense light source.
-
Strong rim light: A glowing edge around the subject’s silhouette.
-
Subtle glow: A soft halo of light around the beam.
-
Natural shadows: Shadows that fall in physically plausible directions.
-
Realistic light falloff: The light should gradually diminish with distance.
-
Bright highlights around the subject: Specular highlights on hair, clothing, and skin.
The goal is to make the flashlight effect interact naturally with the existing environment instead of appearing like a simple digital overlay. This requires the AI to understand how light behaves in the real world—how it reflects, refracts, and casts shadows.
Why Realistic Lighting Is Essential
The anime character itself can have stylized linework and cel shading, but the flashlight beam should interact realistically with the photographic scene. This contrast is what makes the concept interesting. If the light looks fake—too uniform, too bright, or incorrectly angled—the entire illusion collapses.
The beam should illuminate the real subject from behind, creating a bright edge around the silhouette. The surrounding environment can become slightly darker so that the light source remains visually prominent. The final image should still look like a photograph with an anime character added into the scene rather than an entirely animated frame.
The Exact Photo Editing Prompt
Use the following prompt exactly as provided. Copy it without modification for the best results.
Transform the main subject into a small full-body anime/cartoon version of themselves, matching their hairstyle, outfit, accessories, colors, and recognizable details. Use the reference’s clean modern anime aesthetic sharp linework slightly oversized head, compact proportions, cel shading, and expressive details. Position the anime character directly behind the real subject, holding a flashlight aimed forward at their back. Create an intense realistic white beam that fully illuminates the subject from behind, producing bright rim light, glow, and natural shadows. Dim the surrounding outdoor light for dramatic contrast. Preserve the original scene, camera angle, composition, and realism.
Preserving the Original Photograph
One of the most important instructions in this AI prompt is to preserve the original scene. The edit should not completely replace the background or change the camera perspective. The original scene, camera angle, composition, environment, subject positioning, and overall realism should remain intact.
Only the requested anime character and lighting effect should be added to the photograph. This helps create the impression that the miniature character was actually present when the photograph was taken.
The Importance of Context
When you preserve the original context, the added anime character feels like it belongs in the scene. If the background changes or the camera angle shifts, the illusion breaks. The viewer is reminded that they are looking at a digital creation, not a real photograph.
By keeping the original scene intact, you maintain the “photographic” quality of the image. The anime character becomes a playful addition rather than a replacement for reality.
Dramatic Outdoor Lighting
The surrounding outdoor light is intentionally reduced to make the flashlight stand out. The anime character’s flashlight becomes the primary dramatic light source, producing a bright white beam against the darker environment.
The real subject should receive believable illumination from behind, including a subtle glowing edge around the body and clothing. Natural shadows should remain visible so that the lighting doesn’t look artificially pasted onto the image.
This technique—darkening the environment to emphasize a light source—is commonly used in cinema and photography. It is called “negative fill” or “lighting contrast,” and it is highly effective at drawing the viewer’s eye to the most important part of the image.
Tips for Getting a Better Result
For a stronger edit, use a clear reference photograph where the main subject’s outfit and hairstyle are easy to identify. The better the original reference image, the easier it is for the model to maintain the visual relationship between the real subject and the anime version.
Here are some practical tips:
-
Use a high-resolution original image: More detail means better results.
-
Make sure the subject is clearly visible: Avoid photos where the subject is obscured or in shadow.
-
Keep the outfit details unobstructed: Patterns, colors, and accessories should be visible.
-
Use a photo with enough background space for the miniature character: The anime figure needs room to stand behind the subject.
-
Keep the anime character directly behind the subject: This positioning creates the strongest visual connection.
-
Match the character’s clothing colors with the original: Consistency is key to the illusion.
-
Keep the flashlight beam realistic: Avoid overly bright or uniform beams.
-
Avoid excessive glow: The light should feel natural, not like a lens flare.
-
Preserve the original camera perspective: Do not change the angle or framing.
-
Keep the surrounding environment photographic: The background should remain realistic.
Creative Variations to Try
Once the basic concept works, you can experiment with different versions. For example:
-
Mini anime character holding a lantern: A warmer, softer light source.
-
Tiny cartoon version holding a camera: A playful, meta twist.
-
Anime character creating a glowing light effect: A magical or fantasy vibe.
-
Mini character standing beside the subject: A more straightforward companion pose.
-
Small anime character pointing a laser-like light: A more dramatic, sci-fi aesthetic.
-
Anime version holding an umbrella: A cute, practical accessory.
-
Mini character appearing from behind a wall: A surprising, peek-a-boo effect.
The important part is to keep the original scene and camera composition consistent. The variations should feel like different “episodes” of the same concept.
Frequently Asked Questions
Q: Can I use this prompt with any AI image generator?
Yes, though results will vary by platform. The prompt is written as a detailed visual description, so it can be adapted to most modern AI image tools that support reference images and mixed-style generation.
Q: Why does the anime character sometimes not match the real person?
AI models may struggle to maintain consistency between the real subject and the anime version. To improve results, use a high-quality reference image and emphasize “matching hairstyle, outfit, and accessories” in your prompt.
Q: What if the flashlight beam looks fake?
Specify “realistic light falloff,” “natural shadows,” and “physically accurate lighting” in your prompt. Regenerating the image often helps as well.
Q: Can I change the flashlight to a different object?
Absolutely. The prompt can be adapted to describe a lantern, a glowing crystal, a camera flash, or any other light source that suits your creative vision.
Final Thoughts
The combination of a realistic photograph and a miniature anime version of the same person creates a fun mixed-reality effect. The matching hairstyle, outfit and accessories help connect both versions, while the flashlight introduces a dramatic lighting element.
The strong white beam, rim light, natural shadows and darker surroundings can make the final image feel cinematic without sacrificing the realism of the original photograph. This concept is a great way to experiment with AI photo editing while creating something that is both visually striking and emotionally engaging.
For more creative photo-editing concepts and ready-to-use image prompts, Prompt Ayesha and Prompt Replica brings together different ideas for realistic portraits, anime transformations, cinematic edits and social-media-friendly visuals.
Did you find this guide helpful? Share it with someone who might benefit from it. Have questions or want to share your results? Leave a comment below and join the conversation!